- Add an additional CDM Admin user
- Enable Device auto registration
- in a PoC disable Set password expiration date
- In a PoC set VNC to Instant Connect
- add a signed certificate when possible
- set Tomcat service to Automatic (Delayed Start)

- Setup Mailer Engine
- Setup DNS and / or DHCP options for auto device registration
- Think about your device group structure
- Think about profile groups
- Create a Master Image
It is recommended to install CDM Software Repository on a different drive than System drive.
One Windows 10 IoT Image is minimum 6-8GB. If you are using “Clone & Deploy feature it can grow to 20GB++ easily.


apps: is for all programs, tools scripts, zips which can be deployed through CDM
There is no CDM Web-UI option to upload files here. You need to copy these file manually to this location.
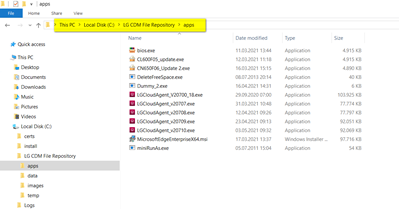
data: is for things like registry files, configs, pictures, certificates
You can use CDM Web-UI to upload files to this location, but you also use manual copy.

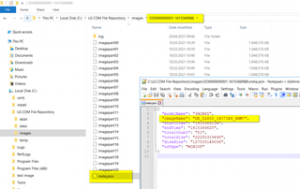
images: here you will find firmware images created by CDM Clone feature
You can copy or duplicate image folders also manually.


temp: Temporary location of image files during CDM clone process.
(it should be empty if no clone operation is in progress)
There are tree ways how CDM is triggering synchronization:
- during boot-up
- after a per-defined time


- manually through CDM Web-UI (recommended after any manual file action on repository)


CDM Web-UI allows you to give an image name during Image Clone process. After this you are only able to modify the image description.


Directory name is hard coded during Clone Image Process. As long as you are not using the image, you can rename both (directory and image name) manually.

CDM AdminGuide includes a description on how to restore your CDM database.
The pdf contains a a batch file (as text) restore-lgcdm.bat.
During cut & past will be copied as well, resulting in a not working bat.
To avoid these issues you can download this file here:
(just rename file extension to bat)
For trouble shooting these files are very helpful.
# Windows command prompt
# SET YOUR_LGCDM_HOME="C:\Program Files\LG CDM"
# In %YOUR_LGCDM_HOME%\apache-tomcat
# api-service logs
api-service.log
api-service.log.xxxx-xx-xx.x.gz
# repository service logs
file-repository-service.log
file-repository-service.log.xxxx-xx-xx.x.gz
Sometimes it happens customer is not using a Windows DHCP Server.
For this I have a sample what I am using in my ISC DHCPd
- First I define LG CDM specific DHCP options (similar to Windows set predefined options)
- Then i group LG cloud devices based on its vendor part of MAC-Address
- Last step is to create a DCHP Pool for LG Devices and set the values for DHCP options
authoritative;
option LGCDM code 190 = string;
option lgcdm_token code 193 = string;

class "lg600" {
                match if (binary-to-ascii(16,8,":",substring(hardware, 1, 3))) = "54:b2:3";
                #log (debug, binary-to-ascii(16, 8, ":", substring (hardware, 1, 3)));
		}
        class "lg500" {
                match if (binary-to-ascii(16,8,":",substring(hardware, 1, 3)) = "b4:2e:99");
                #log (debug, binary-to-ascii(16, 8, ":", substring (hardware, 1, 3)));
		}

# Homenet
subnet 192.168.1.0 netmask 255.255.255.0 {
	authoritative;
	option domain-name "lab.gui";
	server-name "debserver";
	pool {
		allow members of "lg600";
		allow members of "lg500";
		deny members of "other";
		range 192.168.1.101 192.168.1.115;
		option domain-name-servers 172.16.60.100;
		option domain-name "lab.gui";
		option domain-search "lab.gui";
		option routers 192.168.1.3;
		option LGCDM "LGCDM/192.168.1.240:443";
		option lgcdm_token "linux1";
}# Windows command prompt
# SET YOUR_LGCDM_HOME="C:\Program Files\LG CDM"
$ cd %YOUR_LGCDM_HOME%\mongodb\bin
$ mongo.exe --host=127.0.0.1 --port=27017 --authenticationDatabase=TCMS --username=lgcdm --password
## mongo shell
> use TCMS
# check to be switched db TCMS
> db
# Step 1. find Clone Image events having Pending status
> db.event.find({"eventStatus":"PENDING", "eventType":"IMAGE_CLONE"})
# Step 2. Delete events
> db.event.deleteMany({"eventStatus":"PENDING", "eventType":"IMAGE_CLONE"})
{{# { "acknowledged" : true, "deletedCount" : xx }}}
# Step 3. check whether events deleted or not
> db.event.find({"eventStatus":"PENDING", "eventType":"IMAGE_CLONE"}) ## Windows command prompt # SET YOUR_LGCDM_HOME="C:\Program Files\LG CDM" $ cd %YOUR_LGCDM_HOME%\mongodb\bin # dump your mongoDB # should input your password of mongoDB $ mongodump.exe --host=127.0.0.1 --port=27017 --username=lgcdm --password=xxxx --db=TCMS --out=C:\temp # c:\temp\TCMS directory will be created, and then your mongoDB data will be dumped to the directory.
Modify the config file
- Unordered List ItemIn the $LGCDM_ROOT_PATH$\conf\service\api-service.properties file, change the value of the “api.config.FQDN” key to the
IP you want to set and save it. $LGCDM_ROOT_PATH$ is the path where LGCDM is installed, and the default value is “C:\Program Files\LG CDM”. Ex) When the server IP is changed from 192.168.0.100 to 192.168.0.200 Change api.config.FQDN=192.168.0.100 to api.config.FQDN=192.168.0.200 and save
- Unordered List ItemIn the $LGCDM_ROOT_PATH$\conf\service\repository-service.propertiess file, change the value of the “repository.host” key to the IP you want to set and save it. Ex) When the server IP is changed from 192.168.0.100 to 192.168.0.200 Change repository.host=https://192.168.0.100 to repository.host=https://192.168.0.200 and save
Restart Tomcat service
Restart the LG_Tomcat service and use it.
This description should help to setup a reverse proxy what would allow to LG ThinClients to reach a CDM Server behind a router / NAT configuration.
In company environments “Reverse Proxy” will sit in DMZ. Final goal is to be able to fully control ThinClients outside of company network.
Either in Home-Offices or Branch-Offices without VPN connection.
Make sure you are using TLL listed domain names. (.local will not work)
Sample configuration for NGINX web server (nginx.conf):
#user  nobody;
worker_processes  1;

#error_log  logs/error.log;
#error_log  logs/error.log  notice;
#error_log  logs/error.log  info;

#pid        logs/nginx.pid;


events {
    worker_connections  1024;
}


http {
    include       mime.types;
    default_type  application/octet-stream;

    #log_format  main  '$remote_addr - $remote_user [$time_local] "$request" '
    #                  '$status $body_bytes_sent "$http_referer" '
    #                  '"$http_user_agent" "$http_x_forwarded_for"';

    #access_log  logs/access.log  main;

    sendfile        on;
    #tcp_nopush     on;

    #keepalive_timeout  0;
    keepalive_timeout  65;

    #gzip  on;


    # another virtual host using mix of IP-, name-, and port-based configuration
    #
    #server {
    #    listen       8000;
    #    listen       somename:8080;
    #    server_name  somename  alias  another.alias;

    #    location / {
    #        root   html;
    #        index  index.html index.htm;
    #    }
    #}


    # HTTPS server
    #
    server {
        listen       443 ssl;
        server_name  localhost;

        ssl_certificate      C:/Users/jr/Desktop/nginx-1.21.0/cert/cert.pem;
        ssl_certificate_key  C:/Users/jr/Desktop/nginx-1.21.0/cert/cert.key;

        ssl_session_cache    shared:SSL:1m;
        ssl_session_timeout  5m;

        underscores_in_headers on;

        ssl_ciphers    HIGH:MEDIUM:!SSLv2:!PSK:!SRP:!ADH:!AECDH:!DH:!IDEA:!RC2:!RC4:!RC5:!RC6:!MD4:!MD5:!SHA1:!DES:!2DES:!3DES;
        ssl_prefer_server_ciphers  on;

        location /api-service/vnc {
            proxy_pass https://lgcdm01.lge.com/api-service/vnc;
            proxy_pass_request_headers on;

            proxy_http_version 1.1;
            proxy_set_header Upgrade $http_upgrade;
            proxy_set_header Connection "Upgrade";
        }

        location / {
            proxy_pass_request_headers on;
            proxy_pass_header Server;
            proxy_set_header Host $host;
            proxy_set_header X-Real-IP $remote_addr;
            proxy_set_header X-Forwarded-For $proxy_add_x_forwarded_for;
            proxy_set_header X-Forwarded-Proto $scheme;

            proxy_pass https://lgcdm01.lge.com/;

            sub_filter_once off;
            sub_filter_types application/json;
            sub_filter '10.177.45.80' '$server_addr';
        }

    }

}

stream {
    server {
        listen 5672;
        proxy_pass lgcdm01.lge.com:5672;
    }

    server {
        listen 55901;
        proxy_pass lgcdm01.lge.com:55901;
    }
}
verify settings on LG CDM Server:
When you change values here, reboot server.


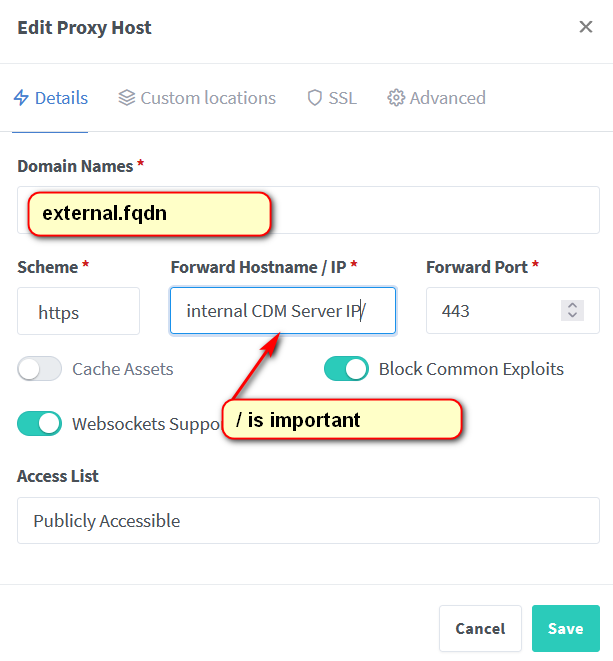
When using Nginix Proxy Manager it could look like this:


for Apache Tomcat listening on port 444:
netstat -aon | find /i "listening" | findstr ":443"
For RabbitMQ liseting on port 5672:
netstat -aon | find /i "listening" | findstr ":5672"
This command shows procces listening on ports ising the PID:
tasklist /fi "PID eq <PID>"